

How To Put Your Ge Refrigerator Pfe28rshfss Into Diagnostic Mode
Key Points
- The temperature display/control panel tin be used to access self-diagnostic way to aid the technician (in this case, y'all)
- Self-diagnostic mode can be used to place failed or improper operation of components (i.eastward. defrost heater, damper, fans, temperature sensors, etc.)
- Simple exam to see if the main electronic board is working
Intro to Self-Diagnostic Fashion
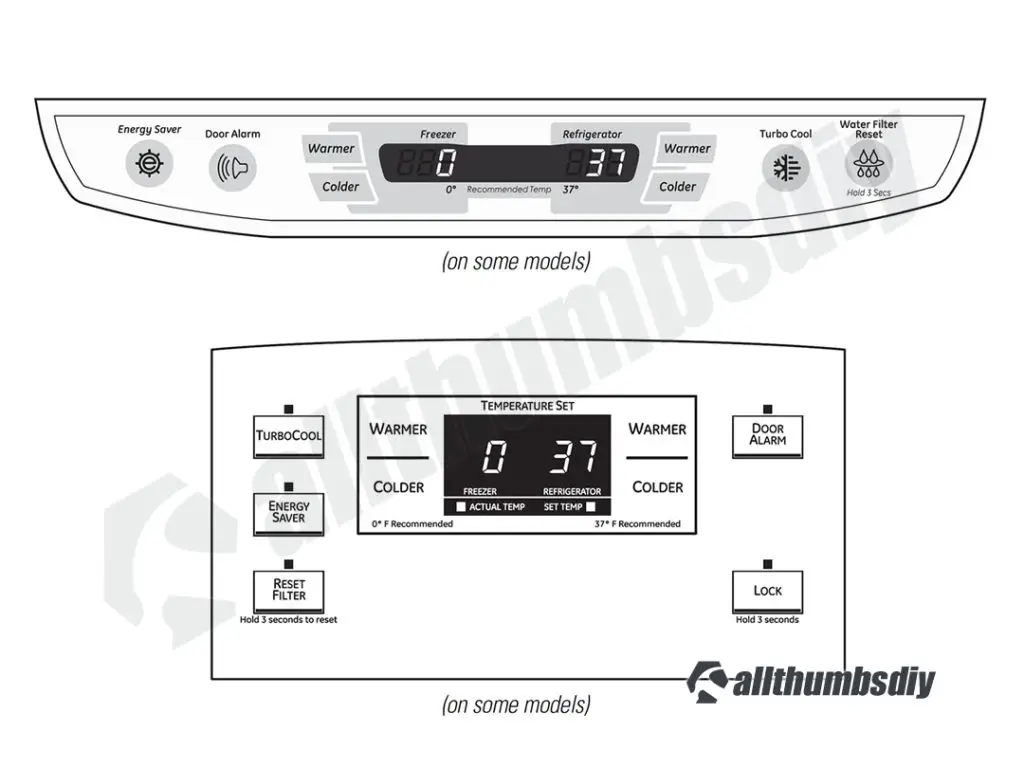
GE Profile French-Style Fridge (Model PFCF1NFW; PFCF1NFWABB, PFCF1NFAWW, PFCF1NFWASS) comes with a dual temperature brandish/control panel. In addition to decision-making temperatures for the freezer and fresh nutrient compartments, it besides controls door alarm, Turbo Cool, water filter alarm and other features.
More importantly, this LED panel can be used to access the refrigerator's internal diagnostics mode that is used by GE technicians. Please note that this control diagnostic function does not identify issues you may exist experiencing with your refrigerator (i.e. symptoms like fridge being warm).
So how is this useful? Instead of forcing you to examination each individual components, the diagnostic module volition test and brandish the component status (i.east. Pass or Fail). Yous can then take this information to further triage your trouble show in my post "How to Diagnose and Gear up Your GE Profile Refrigerator"
Components That Tin exist Tested
The internal control diagnostics mode tin test to see if the post-obit four (4) components are in working order ("P" or pass) or not ("F" or fail):
- Thermistors
- Evaporator Fan
- Defrost heater
- Damper
Thermistors
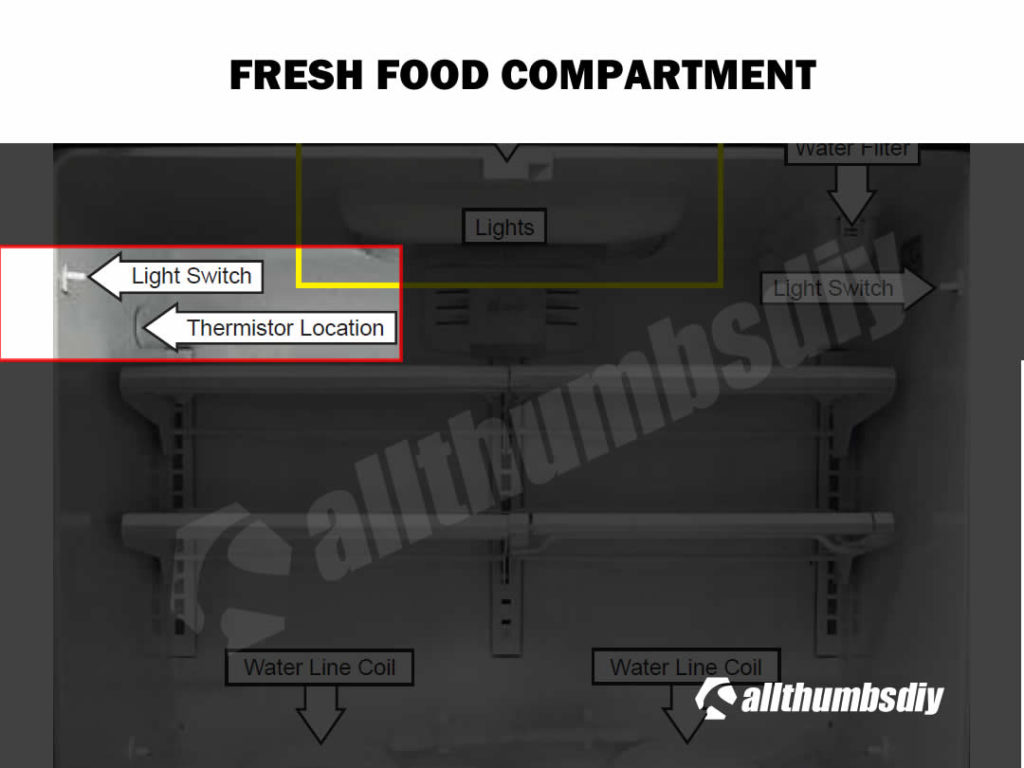
Thermistors are sensors that provide temperature information to the master PCB. There are four thermistors located in:
- I, Fresh Nutrient (FF) compartment – located on the upper left wall
- Ane, Freezer (FZ) compartment – located on the right lower wall
- Ane, Evaporator capillary tube – located on the rear (cover panel must be removed)
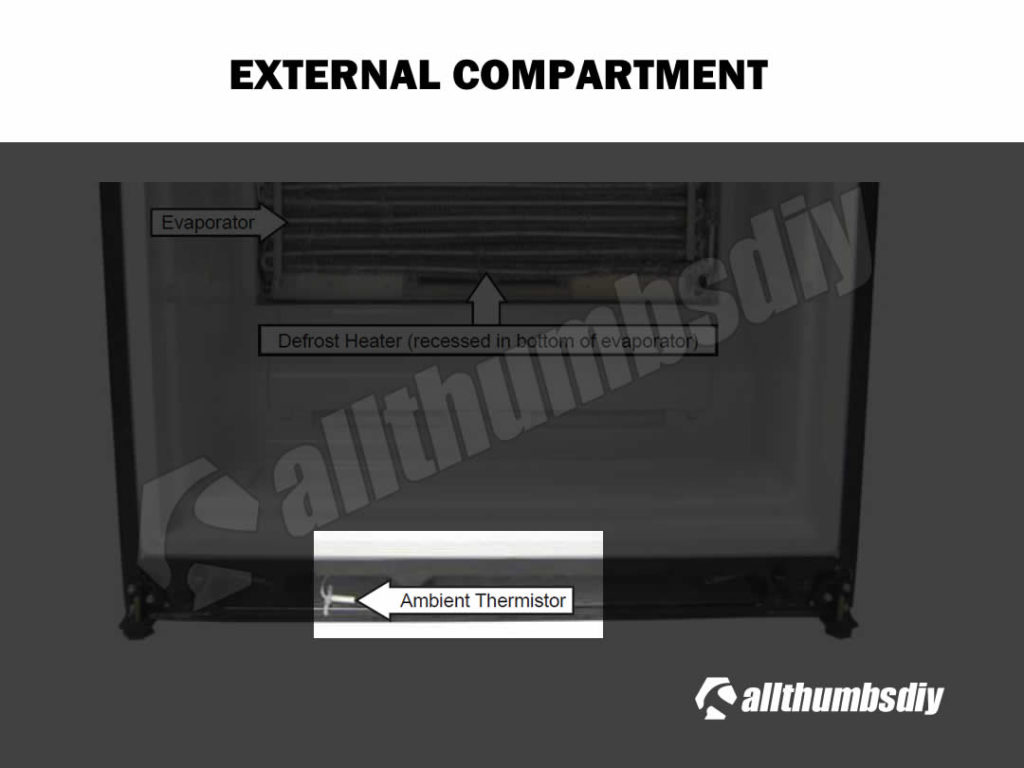
- One, Ambient – located on the front end bottom (toe kick panel must be removed)
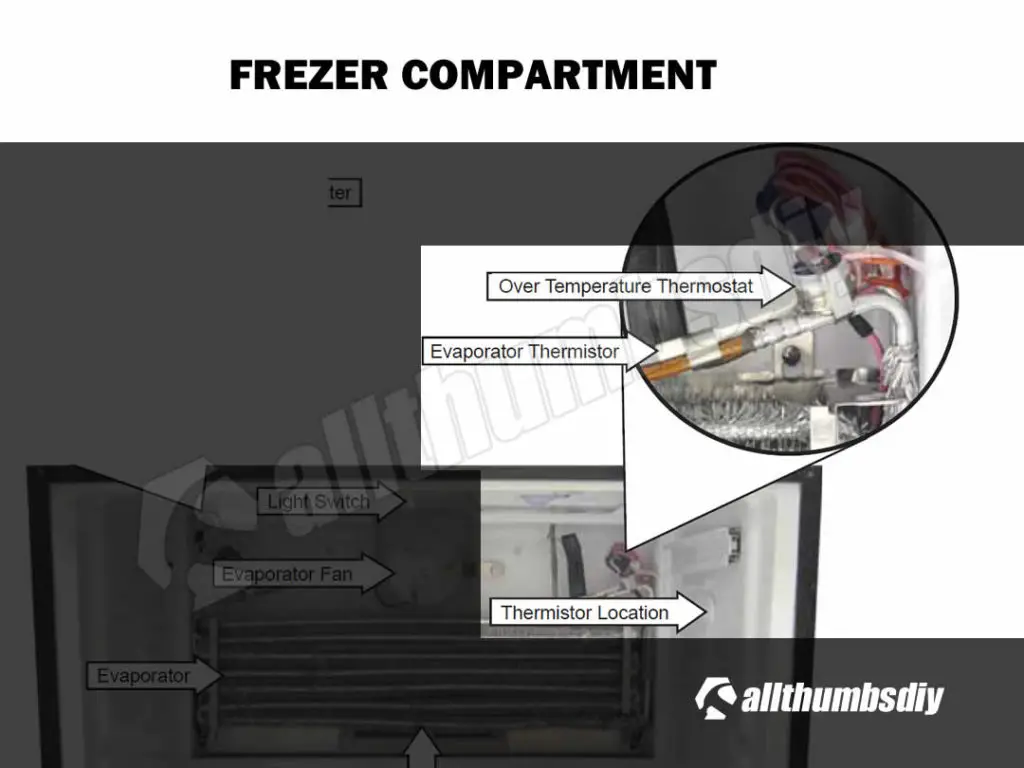
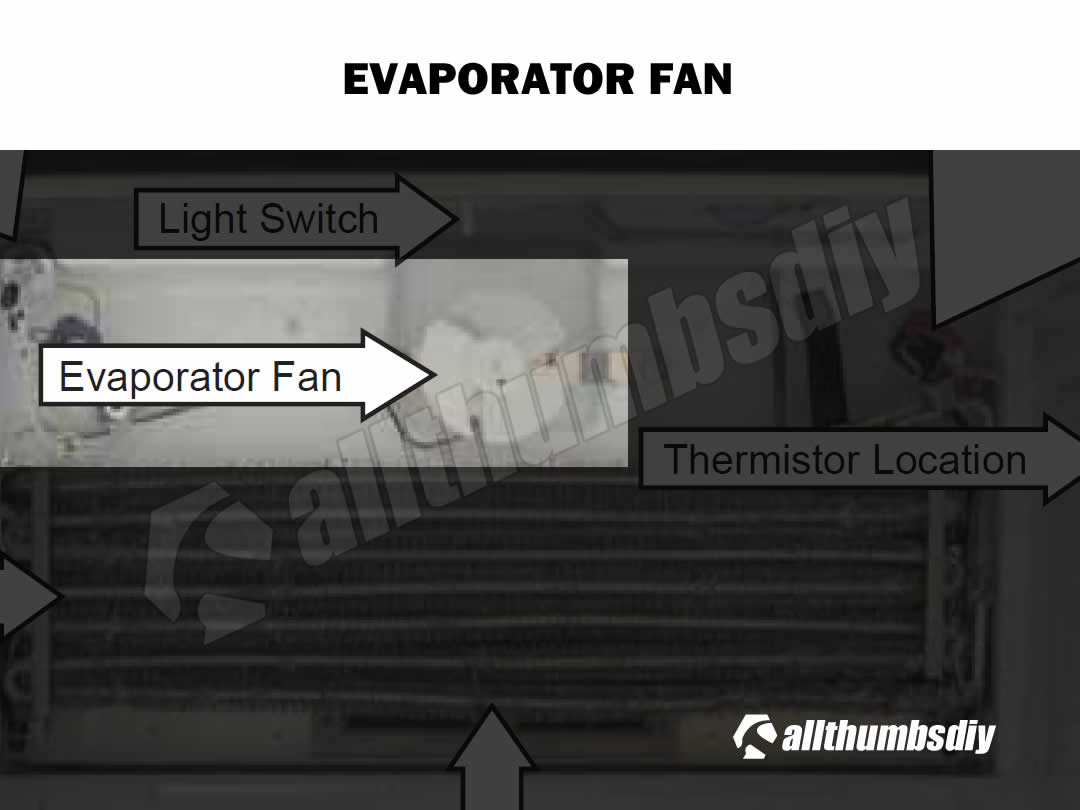
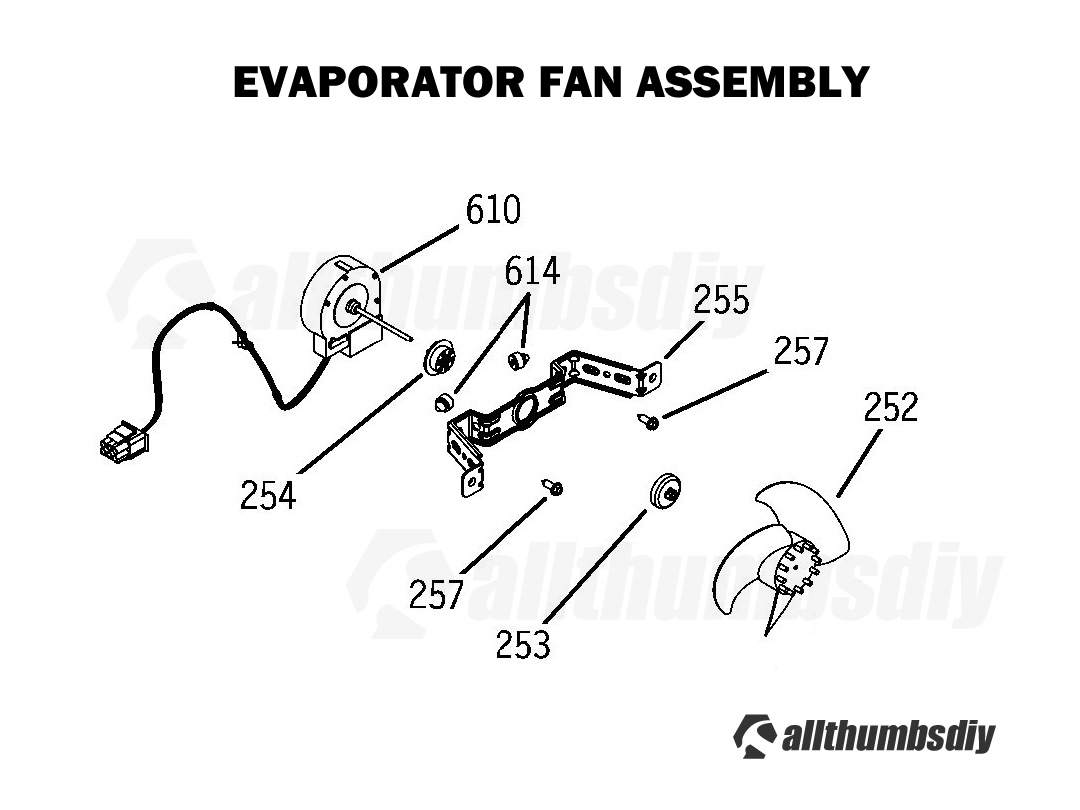
Evaporator Fan
Evaporator fan (consisting of a motor and fan blade) is responsible for pushing air around for both fresh food and freezer compartments. Considering the motor operates in a very cold environs, it is susceptible to failure, specially during ice build up.
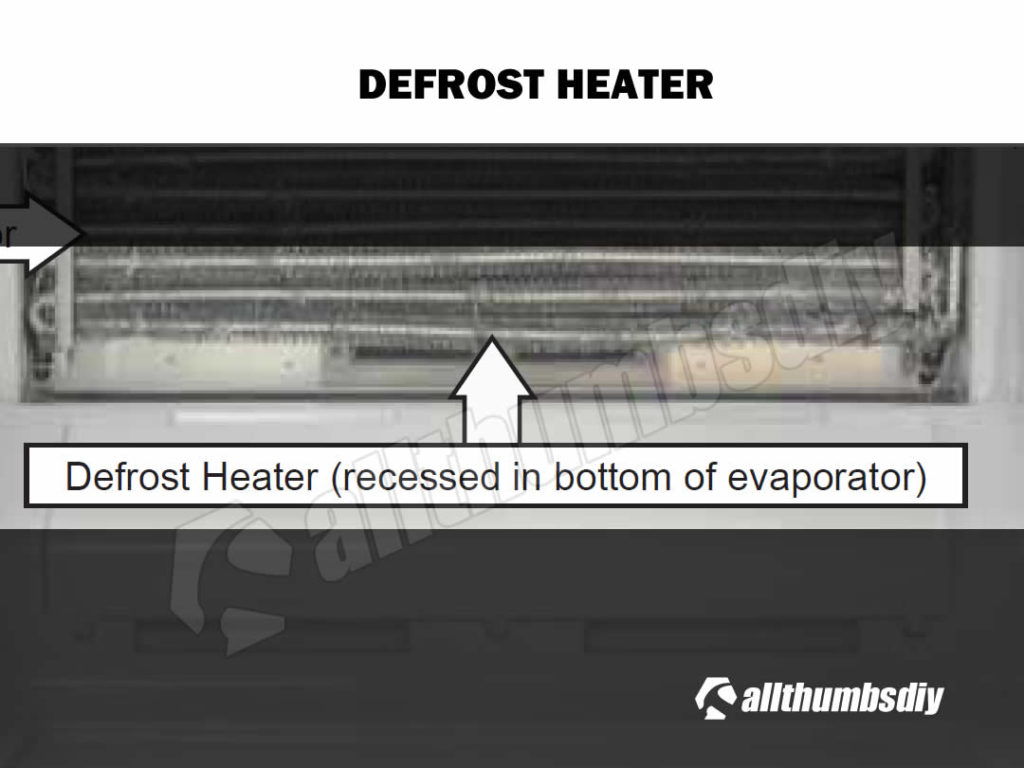
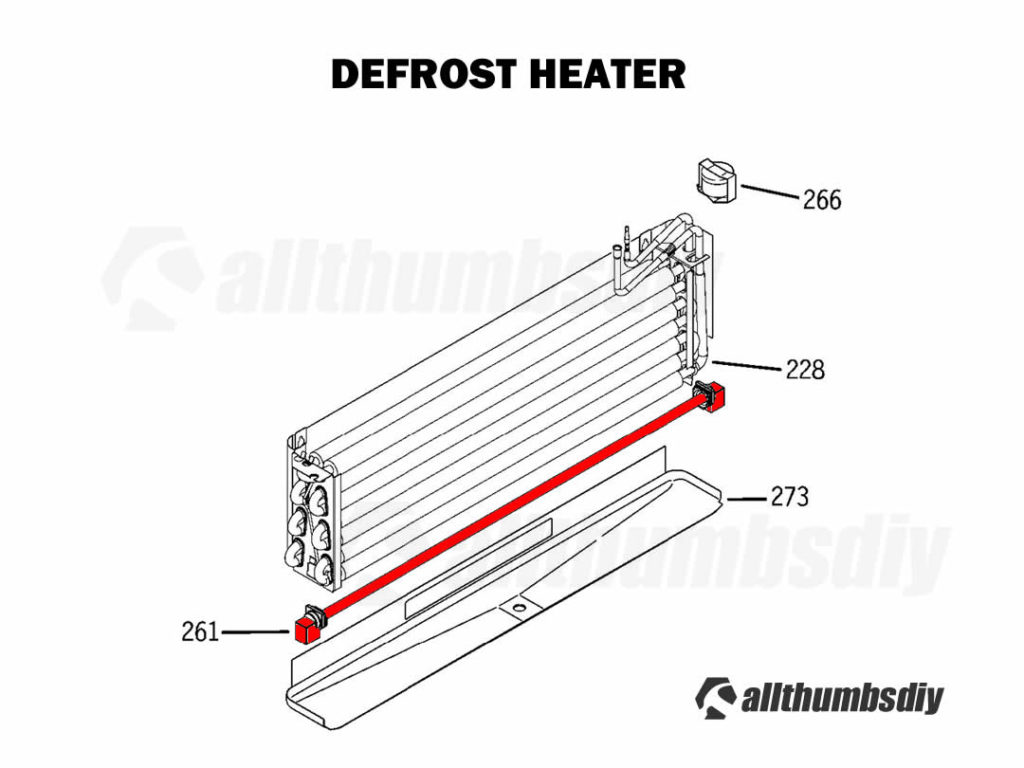
Defrost Heater
Defrost heater is used to remove ice build upwardly on the evaporator located in the freezer section. GE PFCF1NFW performs up to 4 defrost cycles per day with each cycle lasting anywhere betwixt 30 -45 minutes.
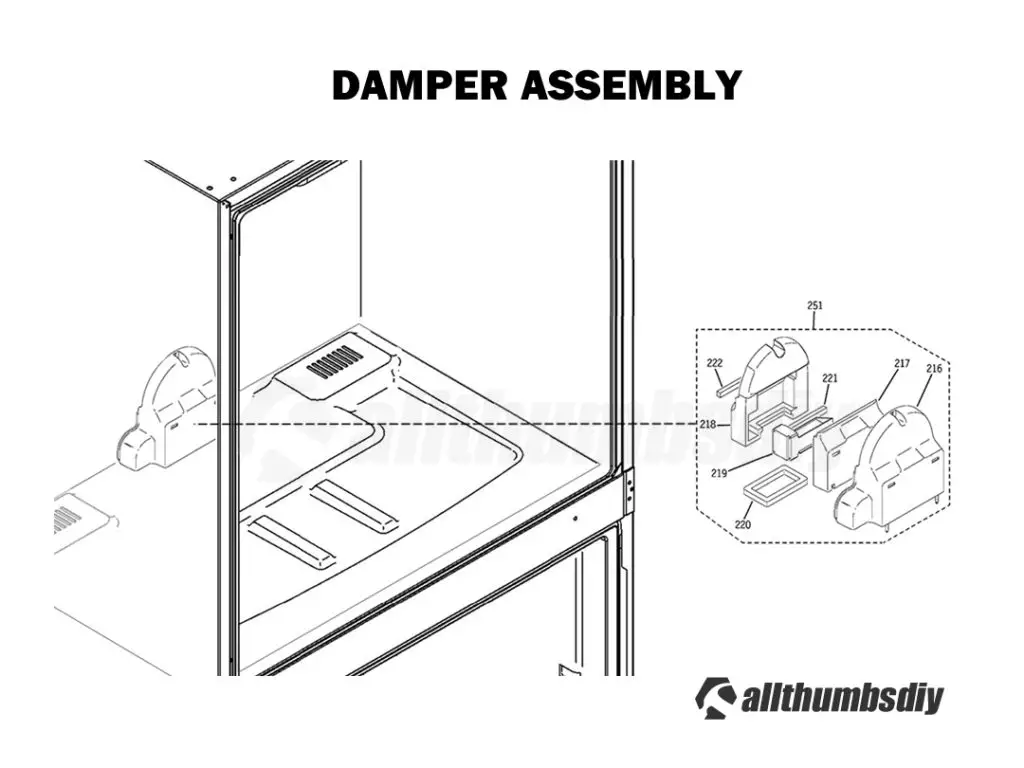
Damper
Damper controls how much cold air is drawn from the freezer into the fresh food compartment
When using the self-diagnostic mode to test the damper opening/closing, yous should hear a "whirring" audio for two-3 seconds, followed by a brusque pause, and so some other whirring sound for two-3 seconds. Since don't hear whatever sounds or hear clicking sounds, yous volition need to supersede the damper (which is office of the Air Belfry Associates)
What About Other Important Parts?
Critical external components such as the inverter board, compressor, condenser, condenser fan and logic board (main computer) cannot be tested by the internal cocky-diagnostic module.
Each of these components must exist tested individually (please refer to the "How to Diagnose and Gear up a GE PFCF1NFW Refrigerator" post)
Instructions
- Step # one – Open the refrigerator. If the temperature display is blank, printing any temperature buttons once and so that you can see the current temperature for both compartments (the temperature display must be in this "agile" mode in gild to enter the cocky-diagnostic mode)
- Step # ii – Enter the diagnostic mode by pressing both the freezer temperature (COLDER and WARMER) pads and the refrigerator temperature (COLDER and WARMER) pads simultaneously. Yous need to firmly press and hold all 4 pads at the same time for approximately 3-five seconds. It'south quite catchy so you will take to effort several times.
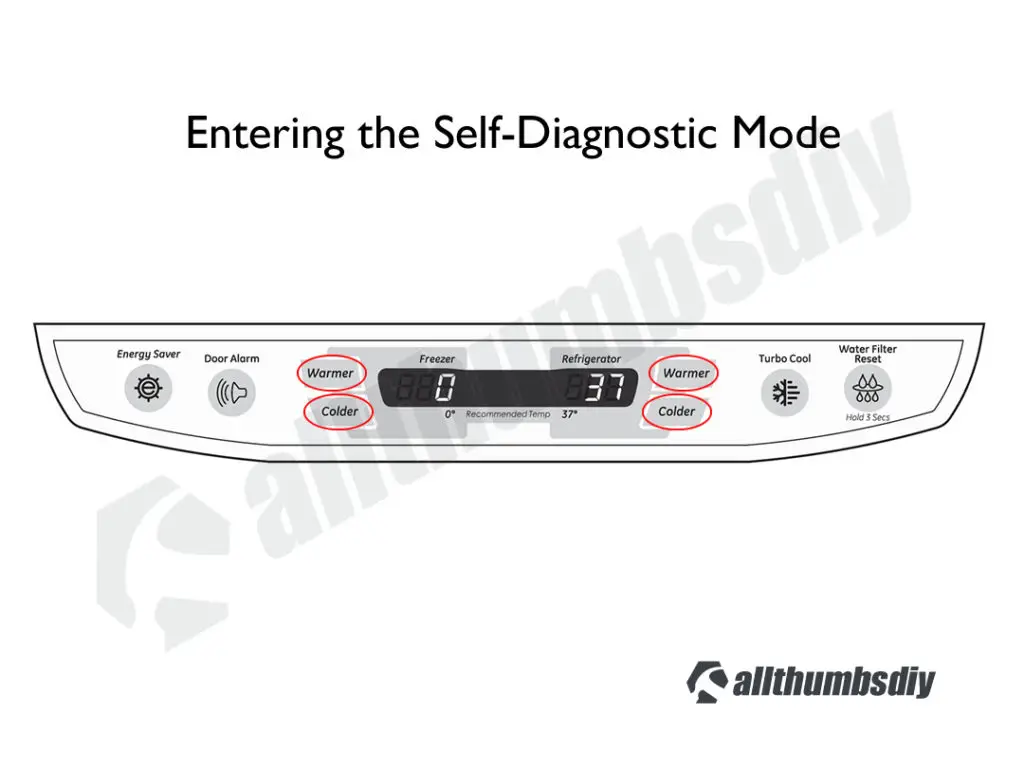
- Step # 3 – Y'all have successfully entered the test way if you see blinking "0"south (zeroes) for both refrigerator displays;
- Footstep # 4 – Rapidly remove your fingers inside 5 seconds of flashing "0"southward and press any temperature buttons to lock-in the test fashion
- Step # 5 – If y'all see blinking "0"southward irresolute to non-blinking "0"s, you lot have successfully entered into the steady-country test fashion; failure to lock-in the exam style within 30 seconds will time out the test and return the refrigerator to the normal cooling mode
- Stride # 6 – "FZ display" is for the freezer temp display. Use Warmer or Colder buttons to increment or subtract the displayed number
- Step # seven – "FF brandish" is for the fresh food (i.e. refrigerator) temp display. Apply Warmer or Colder buttons to increase or decrease the displayed number
- Step # 8 – Match the numbers in the DIAGNOSTIC CODES table below to enter that specific exam mode (numbers will testify in a steady state)
- Step # nine – Press down the "H2o Filter Reset Button" for approximately three seconds to EXECUTE the test
- Step # 10 – Exam is confirmed when the FF and FZ displays glimmer
- Step # 11 – Displays will go blank and exam will begin; one time the test is complete, the fridge volition render to normal functioning
- Stride # 12 – To manually terminate the diagnostic mode, enter "i" in the FZ display and "5" in the FF display and press any primal (i.e. water filter reset button). Screen will go bare about 3 seconds and temperatures volition be displayed once again to confirm that yous have successfully existed the diagnostics fashion
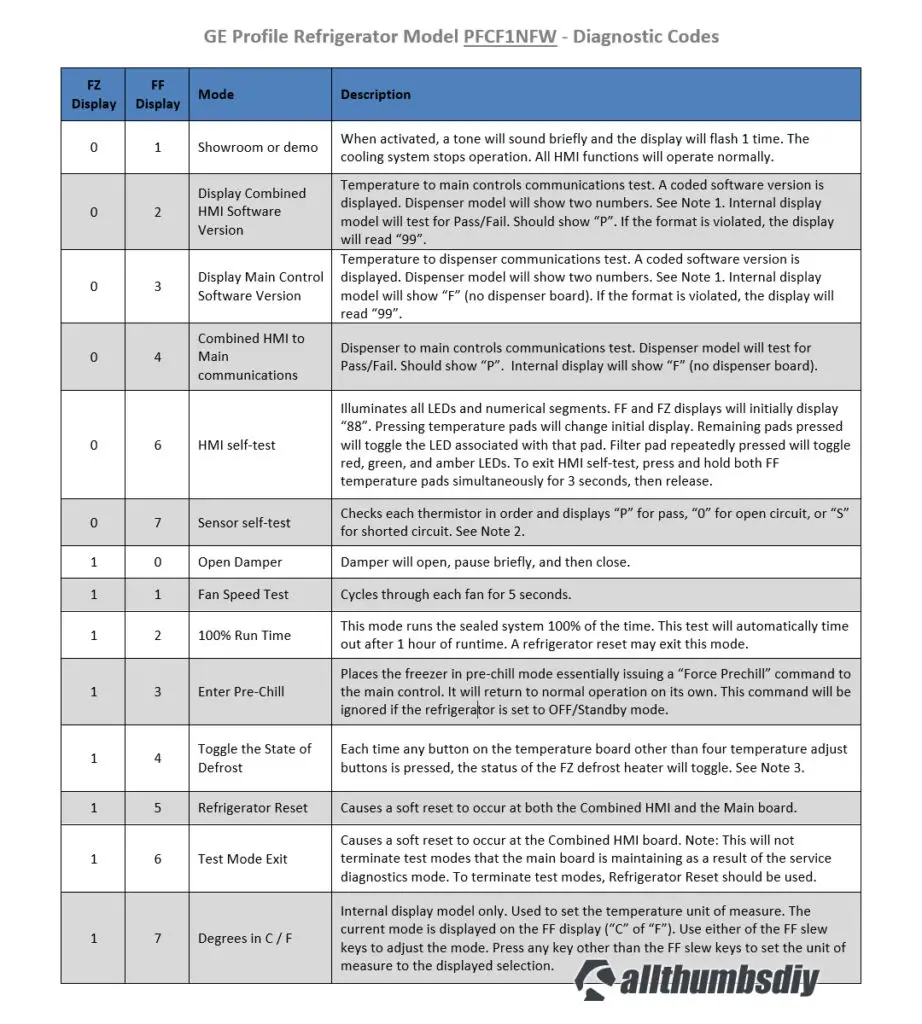
DIAGNOSTIC CODES
On some devices, the code table may not be displayed correctly so I am posting a screenshot as well (directly below).
| FZ Display | FF Display | Fashion | Description |
|---|---|---|---|
| 0 | 1 | Exhibit or demo | When activated, a tone will audio briefly and the brandish will flash 1 time. The cooling system stops operation. All HMI functions will operate normally. |
| 0 | 2 | Brandish Combined HMI Software Version | Temperature to main controls communications test. A coded software version is displayed. Dispenser model will evidence ii numbers. Run into Notation 1. Internal display model will test for Laissez passer/Fail. Should show "P". If the format is violated, the brandish volition read "99". |
| 0 | 3 | Display Main Control Software Version | Temperature to dispenser communications examination. A coded software version is displayed. Dispenser model will prove two numbers. Meet Note i. Internal display model will show "F" (no dispenser lath). If the format is violated, the display will read "99". |
| 0 | 4 | Combined HMI to Master communications | Dispenser to main controls communications test. Dispenser model will test for Pass/Fail. Should show "P". Internal display will show "F" (no dispenser lath). |
| 0 | half-dozen | HMI cocky-test | Illuminates all LEDs and numerical segments. FF and FZ displays will initially brandish "88". Pressing temperature pads will change initial display. Remaining pads pressed will toggle the LED associated with that pad. Filter pad repeatedly pressed volition toggle crimson, green, and amber LEDs. To go out HMI Self Test, press and concur both FF temperature pads simultaneously for iii seconds, then release. |
| 0 | 7 | Sensor cocky-test | Checks each thermistor in order and displays "P" for pass, "0" for open circuit, or "S" for shorted circuit. Run across Note 2. |
| 1 | 0 | Open up Damper | Damper will open up, suspension briefly, and then close. |
| i | 1 | Fan Speed Test | Cycles through each fan for v seconds. |
| 1 | two | 100% Run Fourth dimension | This mode runs the sealed system 100% of the fourth dimension. This test volition automatically fourth dimension out after one hr of run fourth dimension. A fridge reset may exit this mode. |
| ane | 3 | Enter Pre-Chill | This places the freezer in pre-arctic mode essentially issuing a "Force Prechill" control to the chief command. It volition return to normal operation on its own. This command will be ignored if the refrigerator is set to OFF/Standby mode. |
| ane | 4 | Toggle the State of Defrost | Each time whatever push on the temperature board other than four temperature adapt buttons is pressed, the status of the FZ defrost heater will toggle. See Note iii. |
| one | 5 | Refrigerator Reset | Causes a soft reset to occur at both the Combined HMI and the Primary board. |
| one | 6 | Test Mode Leave | Causes a soft reset to occur at the Combined HMI board. Note: This will not terminate examination modes that the master board is maintaining as a result of the service diagnostics manner. To terminate test modes, Refrigerator Reset should be used. |
| ane | 7 | Degrees in C / F | Internal brandish model but. Used to set the temperature unit of measure. The current mode is displayed on the FF brandish ("C" of "F"). Apply either of the FF slew keys to adapt the fashion. Press whatsoever fundamental other than the FF slew keys to prepare the unit of measure to the displayed option. |
- Note 1: The get-go two digits are numbers. The 2nd two digits are numbers that correspond to a letter (01=a, 02=b, 03=c,…26=z). For example, 61 and ix= a software version of 61i. 41 and 10=a software version of 41j.
- Note two: Display order: #1 = Fresh Food Thermistor, #2 = Air Thermistor, #3 = Freezer Thermistor, #4 = Evaporator Thermistor. 05 displayed = No Thermistor installed at this location.
- Annotation iii: The heater volition not come on if the evaporator thermistor is above seventy°F.
Simple Examination to see if the Master Electronic Board is Working
- One simple way to check your logic board is to open up the freezer door, then concur-and-release the door switch three times (freezer light should flicker). If the evaporator fan stops at this indicate, we can confirm that the master reckoner board is performance
- This is a simple macro test, meaning you may still demand to examination certain components on the logic board to verify that it is in working order
Reader Interactions

How To Put Your Ge Refrigerator Pfe28rshfss Into Diagnostic Mode,
Source: https://allthumbsdiy.com/appliances/troubleshooting-ge-pfcf1nfw-refrigerator-using-the-temperature-display-control-to-access-self-diagnosis-mode
Posted by: fisherfoody1986.blogspot.com
0 Response to "How To Put Your Ge Refrigerator Pfe28rshfss Into Diagnostic Mode"
Post a Comment